What’s 3-way Switch Wiring?
3-way switch wiring is a method used in electrical systems to control a single light fixture from two different locations. This type of wiring is common in areas like stairways, hallways, or large rooms with multiple entrances, offering convenience and flexibility in lighting control.
How to Wire a 3-way Switch?
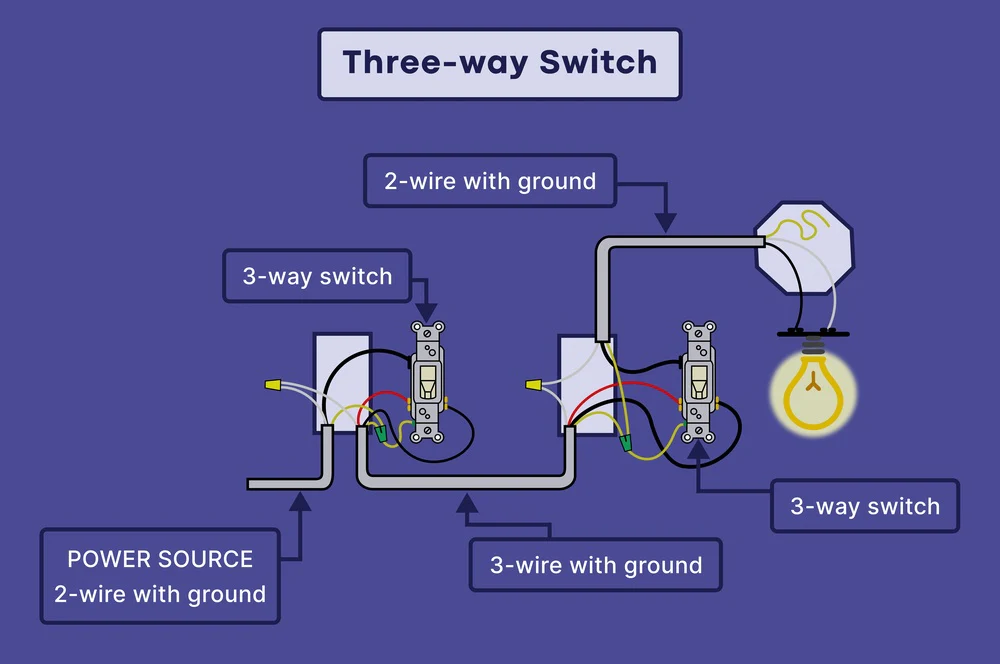
Wiring a 3-way switch involves several steps:
- Identify Wires: Locate the incoming power wire (black), two traveler wires (red and black), and the ground wire (bare or green) in the first switch’s electrical box.
- Connect the First Switch: Attach the black power wire to the common terminal of the first 3-way switch.
- Run a 3-wire Connection: Link the first switch box to the second with a 3-wire (with ground) cable.
- Connect the Second Switch: In the second switch box, identify the black, red, and white cables along with the ground wire. Connect these appropriately to the second 3-way switch.
- Connect to the Light Fixture: Extend a 2-wire cable (with ground) from the common terminal of the first switch box to the fixture location.
- Complete the Wiring: After ensuring all connections are correct, turn on the power at the breaker box and test the 3-way switch system.
3-way Dimmer Switch Wiring
Wiring a 3-way dimmer switch allows for controlling the brightness of a light fixture from different locations:
- Power Off: Ensure the power supply is turned off.
- Identify Wires: Locate the relevant wires in the switch boxes.
- Connect the First Dimmer Switch: Install the first 3-way dimmer switch by connecting the identified wires.
- Run Cable to Second Switch: Extend the appropriate cable to the second switch location.
- Connect the Second Dimmer Switch: Install and connect the second 3-way dimmer switch.
- Connect the Light Fixture: Attach the fixture to the system, ensuring proper wire connections.
- Securing and Testing: Secure all connections, turn on the power, and test the dimmer switch system.
How to Wire a 3-way Switch with 4 Lights?
Wiring a 3-way switch with multiple lights involves a series connection:
- Wire Identification: Locate the incoming power wire and travelers in the first switch box.
- First Switch Connection: Attach the power and traveler wires to the first 3-way switch.
- Second Switch Connection: Run a 3-wire cable to the second switch, connecting it similarly to the first.
- Light Fixture Connections: Connect the first 3-way switch to the first light fixture and continue connecting each light in series.
- Last Light Fixture Wiring: Extend the connection from the last light fixture to the second switch.
- Recheck and Secure: Ensure all connections are correctly made and secure.
Ways to Install a 3-way Switch with 2 Wires?
To install a two-wire smart 3-way switch:
- Wire Identification: Identify the hot wire and the neutral or secondary hot wire.
- Smart Switch Installation: Follow the specific instructions for the smart switch brand and model.
- Secure and Install: Ensure all connections are secure and properly install the smart switch in the electrical box.
How to Figure Out 3-way Switch Wiring?
To wire a 3-way switch correctly:
Identify Components: Recognize the two 3-way switches and their terminals.
- Inspect Wires: Use a voltage tester to identify the hot wire and ensure there’s no voltage in the wires.
- Connect Switches: Attach the hot and traveler wires to the appropriate terminals of the switches.
- Determine Load and Neutral: Locate the load and neutral wires, usually for the light fixture.
- Link to Second Switch: Run a 3-wire connection to the second switch and attach the wires.
- Light Fixture Connection: Extend a 2-wire cable from the second switch to the light fixture and connect it.
- Final Check and Testing: After securing all connections, test the system for proper operation.